Šiandien pasidalinsiu su Jumis savo nuotykiais, kaip aš dekupažavau seną spintelę. Kai pamačiau ją pirmą kartą, pagalvojau, ir iš kur mama ją ištraukė ir kodėl taip nori, kad atnaujinčiau. O pasirodo, ši spintelė buvo mano prosenelio rankomis daryta ir per tiek metų šiaip ne taip išsilaikiusi. Žemiau galima pamatyti keletą nuotraukų, kaip spintelė atrodė pradžioje.
Today I am going to tell you my adventures while decoupaging an old cupboard. When I saw it for the first time, I couldn't understand from where my mum took it and why did she want me to renew it. Later on, I found out that this cupboard was handmade by my grandfather and successfully survived during all these years. Below you can see some photos, how the cupboard looked like at the beginning.


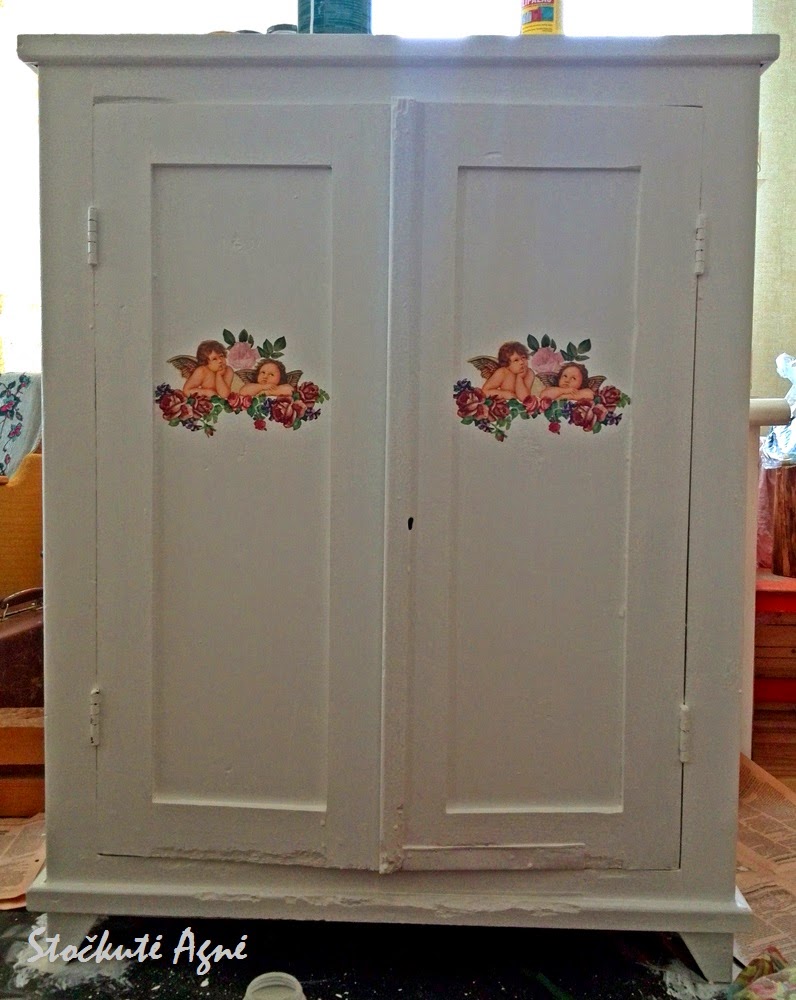
Kaip matome iš nuotraukų, nudažyti spintelę vieną kartą neužteko. Ypač mano atveju, kadangi prieš tai spintelė buvo tamsi. Spintelę dažiau tiek kartų, kol ji pasidarė visiškai balta.
As you can see from the photos, it's not enough to paint the cupboard just once. On my occasion, the cupboard was dark before, so I was painting the cupboard until it got totally white.

Nudažiusi palikau spintelę džiūti ir ėmiausi servetėlių karpymo. Išsikirpau skirtingus motyvus ir dėliojau juos kartu tol, kol radau kompoziciją, kuri man patiko: angeliukai rožėse.
When I finished painting the cupboard, I left it to dry and I started to cut napkins. I was cutting different motives from different napkins and I was putting them all together until I found the design I like: angels with roses.


Today I am going to tell you my adventures while decoupaging an old cupboard. When I saw it for the first time, I couldn't understand from where my mum took it and why did she want me to renew it. Later on, I found out that this cupboard was handmade by my grandfather and successfully survived during all these years. Below you can see some photos, how the cupboard looked like at the beginning.
Apžiūrėjus spintelę pradėjau galvoti ir rinkti priemones jos atnaujinimui. Spintelei atnaujinti naudojau:
- Įvairų švitrinį popierių
- Baltus dažus vandens pagrindu, skirtus vidaus darbams
- Dekupažo klijus-laką vandens pagrindu
- Dvikomponentį sendintoją vandens pagrindu ("Idea")
- Laką vandens pagrindu
- Įvairius teptukus
- Įvairias servetėles
- Rankenėlės spintelei
After I saw a cupboard, I started to think and collect implements for renewing it. To renew the cupboard I used:
- Various sandpaper
- Water-based white paint for inside
- Decoupage water-based glue-lacquer
- Water-based varnish and cracking-varnish (Idea)
- Water-based lacquer
- Various paint-brushes
- Various napkins
- Handles for the cupboard
Visų pirma spintelę išvaliau tiesiog su paprastu vandeniu. Tiek vidų, tiek išorę. Tada, naudodama skirtingus švitrinius popierius, nušveičiau nelygias vietas ir dar kartą visą spintelę nuploviau. Taip paruošiau spintelės paviršių dažymui.
Mano atveju, dažai spintelei nenusiplauna su vandeniu, tad svarbu nepamiršti pasitiesti ką nors po spintele prieš dažant. Tai gali būti paprasčiausiai seni laikraščiai ar nebenaudojama plėvelė. Taip pasiruošus, kibau dažyti spintelę.
First of all, I cleaned the cupboard with simple water: inside and outside. Then I took different sandpapers and I used it to smooth down the surface of the cupboard. After that, I washed my cupboard once more. By doing this, I prepared the cupboard to be painted.
On my occasion, the paint for the cupboard cannot be cleaned with water, so it is important to put something under then cupboard before painting. It could be old newspapers or some cellophane. When I did all this, I started to paint.
Kaip matome iš nuotraukų, nudažyti spintelę vieną kartą neužteko. Ypač mano atveju, kadangi prieš tai spintelė buvo tamsi. Spintelę dažiau tiek kartų, kol ji pasidarė visiškai balta.
As you can see from the photos, it's not enough to paint the cupboard just once. On my occasion, the cupboard was dark before, so I was painting the cupboard until it got totally white.
Nudažiusi palikau spintelę džiūti ir ėmiausi servetėlių karpymo. Išsikirpau skirtingus motyvus ir dėliojau juos kartu tol, kol radau kompoziciją, kuri man patiko: angeliukai rožėse.
When I finished painting the cupboard, I left it to dry and I started to cut napkins. I was cutting different motives from different napkins and I was putting them all together until I found the design I like: angels with roses.
Kadangi aš nenorėjau perkrauti spintelės, nusprendžiau dekupažuoti tik dureles. Servetėlėms priklijuoti naudojau švelnių šerelių teptuką ir specialius klijus-laką vandens pagrindu. Klijuoti reikia tik vieną servetėlės sluoksnį, kitus atskiriant. Klijuoti pradėjau nuo pagrindinio motyvo, klijus tepant nuo centro į išorę, kadangi sušlapusi servetėlė plečiasi. Klijavau švelniais potėpiais, kad nesuplėšyčiau servetėlės ir išvengčiau susiraukšlėjimų. Vieną po kito taip priklijavau visus paveikslėlius ant abiejų durelių.
I didn't want to overload the cupboard, so I decided to decoupage only the doors of the cupboard. To glue napkins, I used soft paint-brush and special water-based glue-lacquer. You need to glue only one layer of the napkin, so others you need to separate. I started to glue from the main motif, from the center to the outside because the napkin starts to expand when gets wet. I was gluing with soft small brushstrokes in order not to destroy the napkin and to avoid the folds. One by another I glued all the pictures on both of the doors.
Spintelė man atrodė tuštoka, tad kampuose ir durelių apačioje dar priklijavau keletą gėlyčių. Nuotraukose galima matyti, kad spintelės paviršius nėra visiškai lygus, tačiau tokius nelygumus palikau vien dėl spintelės senumo. Norint, nelygumus galima užglaistyti specialiu glaistu.
The cupboard looked a little empty for me, so I glued more flowers on the corners and at the bottom of the doors. In the photos you can see that the surface of the cupboard is not smooth but I left it just because of the cupboard's age. If you want, you can fix it with some special filler.
Dabar mano spintelė atrodė taip:
Now my cupboard looked like this:
Planuose turėjau idėją, jog pasendinsiu šiek tiek kraštelius aplink paveikslėlius, taip pas spintelės durų kampus. Bet čia ir prasidėjo visas linksmumas. Daug kartų visur skaičiau, kad sendintoją reikia pasibandyti prieš dirbant su juo. Bet kaip sakant, iš savo klaidų mokomės labiau nei iš kitų.
Sendintojas, kurį naudojau, man buvo naujas ir žinoma, aš jo nepasibandžiau prieš tai, tik perskaičiau instrukcijas ant buteliukų. Pagalvojau: ne pirmą kartą dirbu su dvikomponenčiu sendintoju, žinau kaip jis veikia. Tai buvo didelė klaida.
Užtepus pirmą sluoksnį nieko keisto nepastebėjau, nudžiuvo gražiai (palikau džiūti per naktį). Pradėjus tepti antrą sluoksnį ir pasirodė visas "grožis". Pirmas sluoksnis pradėjo tarsi luptis ir maišytis su antruoju. Nuotraukose apibrėžiau, kad būtų aiškiau. Nepaisant to, palikau džiūti ir antrą sluoksnį per naktį, tačiau jis nenudžiuvo. Tiksliau išdžiuvo tik iki tokio lygio, kad viskas sendintose vietose kimba lyg būtų ištepta medumi. Jeigu valau su vandeniu - kimba dar labiau ir pradeda lipti smulkūs pūkeliai ir visos dulkės aplinkui. Bandžiau pavalyti ir su acetonu, ir su 626 valikliu. Rezultatas tas pats. Palikau spintelę taip kaip yra kelioms dienom, kad nusiraminčiau ir sugalvočiau ką toliau daryti.
Vėliau pabandžiau tą patį sendintoją ant permatomo plastiko, kadangi maniau, kad galbūt sendintojas taip sureagavo dėl dažų, tačiau rezultatas buvo toks pats. Beje, ar kam nors yra taip buvę? Gal žinot kodėl taip atsitiko?
In my plans I had an idea to age the corners around the pictures and the corners of the doors of the cupboard but here it starts all the "joy". Many times I was reading everywhere that you must try the varnish and the cracking-varnish before you start to work with it. Proverbially, you learn from your mistakes more that from others.
The varnish and the cracking-varnish that I used were new for me and I didn't try it before. I just read the instructions on the bottles. I was thinking: it's not the first time I am working with such type of varnish, so I know how it works. It was a big mistake.
When I put the first varnish I didn't see anything strange, it got dry nicely ( I left it to dry during the night). When I started to paint the second layer, I saw all the "beauty". The first layer started to peel off and to mix with the second layer. In the photos I circled it to be more clearly. Despite this, I left both layers to dry during the night but it didn't dry. To be precise, it dried till such a level that everything in the varnished places looked like it's painted with honey: it was sticky. If I was washing with water - it sticked even more and it's started sticking small dusts. I was trying to wash it even with acetone and 626 cleaner. The result was the same. I left the cupboard for few days to calm down and to think what to do after.
After I tried the varnish and varnish-cracker on the transparent plastic because I thought that maybe the varnish was reacting with the paint I was using but the result was the same. By the way, has anybody experienced something similar? Or maybe anybody knows why it happened?
Po keletos dienų nusprendžiau, kad pabandysiu nulakuoti dureles su vandens pagrindo laku, galbūt sendintojas užsilakuos ir viskas susitvarkys. Tiesą sakant rezultatas buvo toks pat, netgi nulakavus dureles: tos vietos, kur buvo teptas sendintojas, lipo.
Nepaisant to, įsukau rankenėles ir palikau spintelę tokią, kokia yra. Gražumo graži, tačiau valyti jos negaliu. Gal kas nors gali pasiūlyti kokį nors sprendimą?
After few days I decided to try to paint the doors of the cupboard with water-based lacquer. I thought, maybe everything will be alright. To be honest, the result was the same: in the place, where were two layers of the varnish and varnish-cracker, was sticking.
Anyway, I put handles into the cupboard and left it as it is. It is quite beautiful, but the problems is that I cannot clean it. Does anybody know any solution?